Chapter One: The Architecture of Starcraft Data Reference: Stardraft CWAD Manager NOTE: Merlin of Camelot Systems is currently doing a substantial overhaul of the entire Stardraft Program, including the CWAD Manager. This tutorial will thus be limited and only be a brief reference for the current version available now (which is 1.07 compatible for most people; and the CWAD Manager isn't version specific any ways, so it doesn't matter). Just keep in mind that by sometime next year, you will have a (possibly completely) different format for this tool. The Stardraft CWAD Manager from 1.05 to the present has come with documentation which explains how to use it. Perhaps you missed it; it is in the Help Menu. :P In general, most people can figure it out from there, but if you can't, it is probably because there is too much information in the help guide, rather than too little. The CWAD Manager is a very, very, very simple utility to use. For now, I will just be showing how to use the "Advanced" tab (not the Standard). Before you do anything else, you must open a CWAD. Don't have any CWADs created yet? Make a new one. Go to the File menu if you're still confused. From the various labels, it shouldn't be hard to figure out how to get stuff in your CWAD and how to get stuff out.
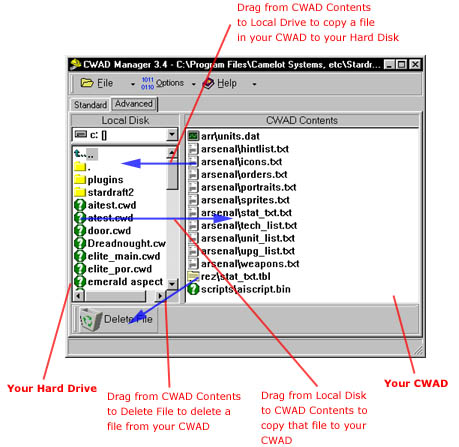
Here is a little diagram:
You can also highlight multiple files by shift-clicking or dragging a box around their icons and drag them all at the same time. In addition, you can select entire folders on your Local Drive to drag into your CWAD. They will be added with the folder name as their subdirectory (e.g., dragging a folder called myfolder\ into your CWAD would place all those files in your CWAD as myfolder\file1.ext, myfolder\file2.ext, myfolder\submyfolder\file3.ext, etc.). When exporting files from your CWAD to your Local Drive, the CWAD Manager will ask you if you want to "Export with full path?" if it is in a subdirectory in your CWAD (e.g., subfolder\myfile.ext as opposed to just myfile.ext). Exporting with a full path means the file will be copied onto your drive in a folder with the subdirectory(ies) name(s), otherwise the subdirectory will be ignored and your file will be copied with just the file name into the current open folder. Now, how do you actually make a CWAD "work" in the Stardraft patch loader? Its pretty simple. If you notice, the directory structure of the CWAD in the example above has exactly the same paths as some files in the MPQs. You want to place your files in your CWAD with the same names and paths as the files that they are supposed to replace (or "patch" over) in the MPQs. So if you have a modified units.dat file you made with Arsenal III, you want to place it in your CWAD as arr\units.dat since that's where that file is normally in the MPQs. You can rename files (including entering a backslash in the name to move it into a subdirectory) in your CWAD by either right-clicking it or highlighting and hovering over it and waiting for a second for a cursor to appear. For the basics, that's all you need to know to make a good CWAD. You just have to make or modify all your files externally on your drive and then import them into a CWAD. But our talented friends over at Camelot Systems have added some more "frills" to the CWAD Manager which you may want to know how to use. Basically, these "plug-ins" are mini-programs that will allow you to edit and create files inside your CWAD without ever having to do anything externally. The same principles hold, this just makes things easier. You can find these plug-ins in the Options menu or if you click the Standard tab, you can find a pretty menu with some of them listed. :) Arsenal II - this is an old editor for DAT files (such as units.dat, upgrades.dat, etc.). In the most recent release of Stardraft it is extremely buggy and it is highly recommended that you edit DAT files externally with Arsenal III for now (and import the DAT files manually into your CWAD). If you insist on some internal DAT file editor, get the older version of Stardraft 1.05. (Still not as good as Arsenal III though) GRP Editor - this tool allows you to export frames from GRP files in your CWAD or import and compile frames from your drive into a GRP in your CWAD. If that didn't make any sense to you, its O.K. This tool is really extraneous, and GRP Editing will be covered later with tools such as RetroGRP (which is a lot faster, even though it is an external editor). Import from MPQ - this mini-utility is essentially an MPQ Viewer. In the file menu, you can have it open a certain MPQ to browse its files. The only difference between this and, say, MPQ View, is that it can extract files from the MPQ directly into your CWAD (instead of onto your drive). Select a file(s) and click a "Save to CWAD" button to get it in there. This is useful when you just want to do certain smaller modifications of files in the MPQ while working within your CWAD. TBL Edit - you won't see this in any menu. You have to get a TBL file into your CWAD first and then double click on it. (There is a small bug that may cause some errors if your CWAD isn't located in your Stardraft directory... so make sure it is :) Its a pretty simple mini-program to use; if you need a little more guidance or want to learn how to do some of the more advanced things like adding a line to a TBL file, see Reference: TBL Edit. Self Running CWAD Generator - this is the little program used to generate SECWADs (self extracting binaries). Just finish up your CWAD, select this and follow the instructions to generate a EXE format CWAD that everyone can run without Stardraft. Make sure you remember to place a *.exe extension on your file your produce. :) This will not effect your actual CWAD (e.g., you will now have a CWAD and a SECWAD). There are several other options in the Options menu, such as setting compression ratios for files. There really isn't any advantage to changing from the High Compression default unless you would like a larger CWAD. And that concludes the CWAD Manager Reference, as it was already dumbed down enough to begin with. Oh wait. There is one final note that you just may want to know about. THE CWAD MANAGER AUTOMATICALLY SAVES AS YOU EDIT YOUR CWAD. YOU CAN NOT UNDO ACTIONS. That's probably an important fact. :) Have fun. |